
Excel Data Cleaner turns messy contact exports into clean, import-ready data — standardizing emails, phone numbers, names, dates, and addresses, then finding and removing duplicates. This guide covers a quick start to get you going, followed by a full reference for every step.
Quick start — clean your first file in 5 steps
- Open the file and enable macros. The tool’s buttons only work with macros on. If nothing responds, see how to enable macros.
- Select Data. On the Home page, click Open CRM Cleaner, then Select Data — either import a file or paste your data.
- Tag Columns. Tell the tool which column is the email, which is the phone, and so on.
- Clean and approve. Run each cleaning step and Review & Approve the changes — or Skip any data type you don’t need to clean.
- Finalize and Export. Click Finalize, then Export to save your cleaned file — or export a ready-to-import file for your CRM.
What Excel Data Cleaner does
Excel Data Cleaner is a Microsoft Excel tool (a macro-enabled .xlsm workbook) that runs entirely on your own computer — your data never leaves your machine. You bring in a contact export from your CRM or spreadsheet, the tool standardizes and de-duplicates it through a guided series of steps, and you export the cleaned result — either as a clean spreadsheet, or as a file formatted for direct re-import into HubSpot, Salesforce, Zoho, Pipedrive, or Monday.
Everything happens through a dashboard that walks you through the work one step at a time, so you always know what’s done and what’s next.
Getting started with Excel Data Cleaner
1. Enable macros
Because the tool is macro-driven, Excel must be allowed to run its macros. The first time you open the file you may see a Protected View bar (click Enable Editing) and a macro security message. If the tool’s buttons don’t respond, follow the short guide on enabling macros — it’s the single most common setup question.
2. Start from the Home page
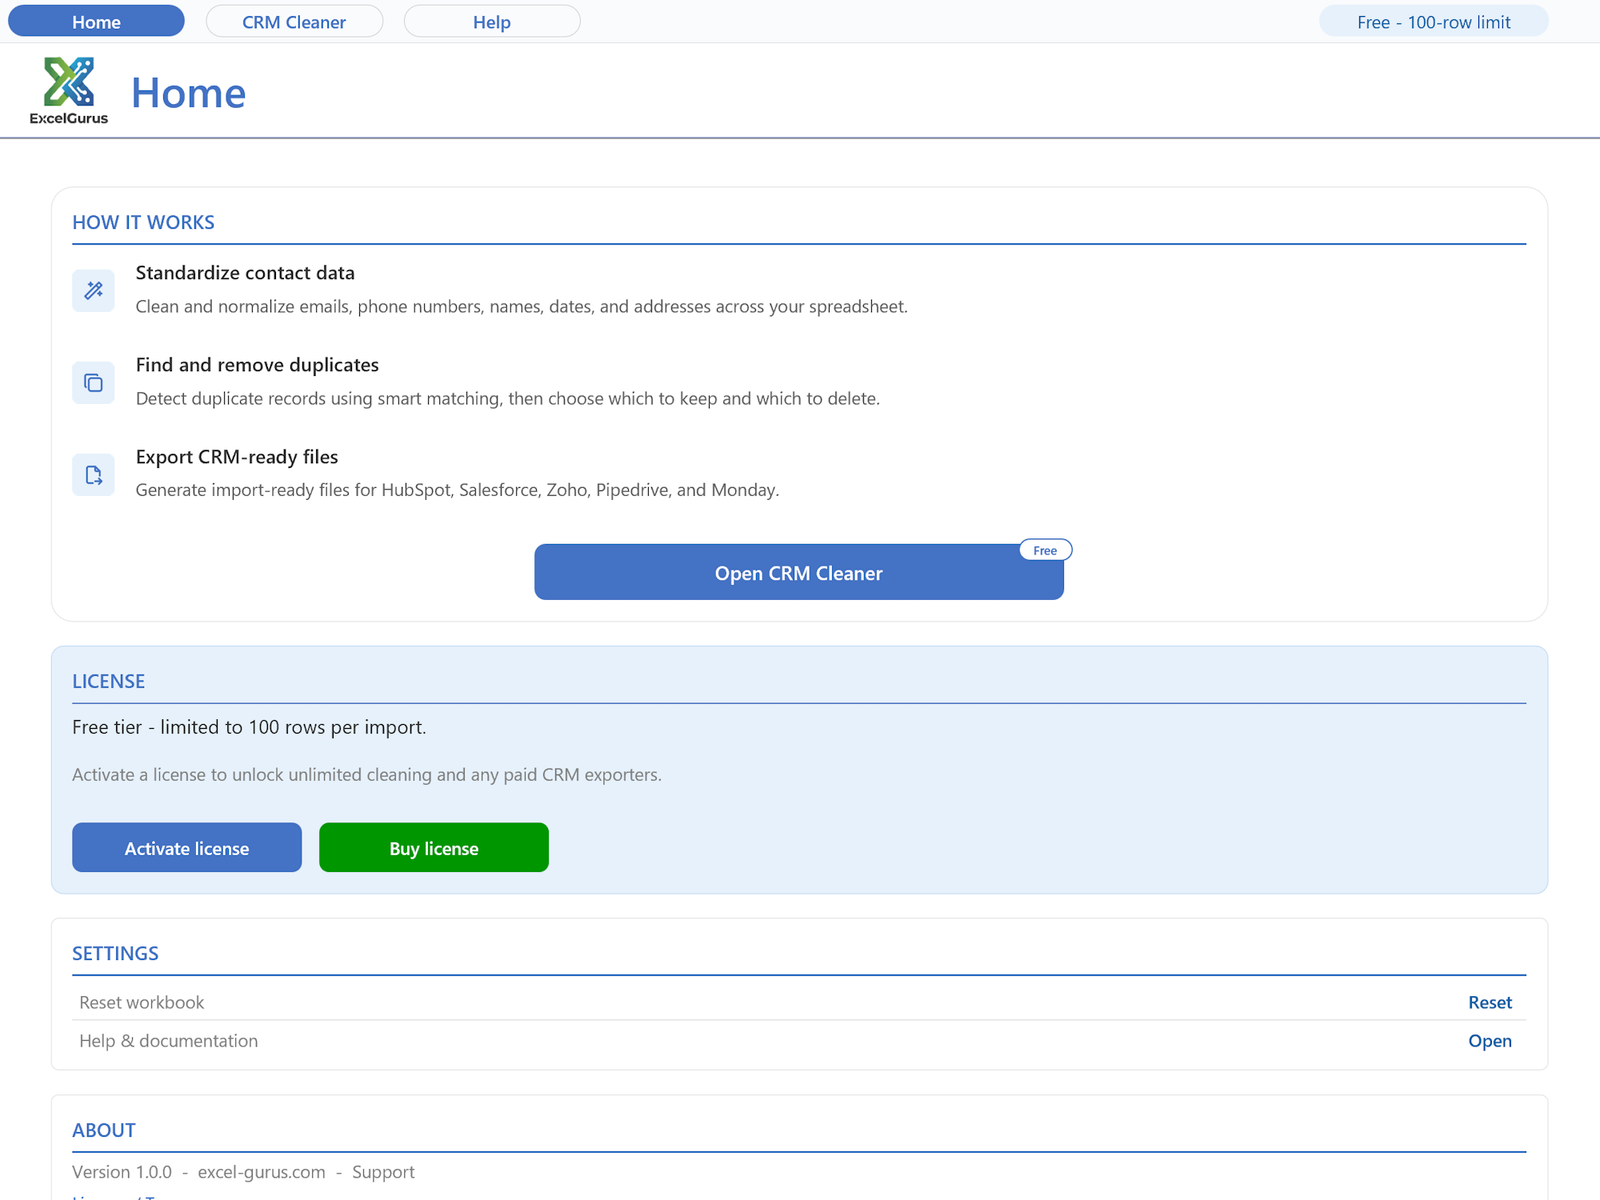
When the workbook opens, you’ll land on the Home page. It shows your workflow and a button to open the cleaner. If you’ve purchased a license, this is also where you’ll see your license status.
3. Activate your license (optional)
The tool works right away on the free tier (up to 100 records per import). To remove the record limit and unlock CRM export files, activate a license — see Licensing & activation below. Don’t have a license yet? You can get one here.
The workflow, step by step
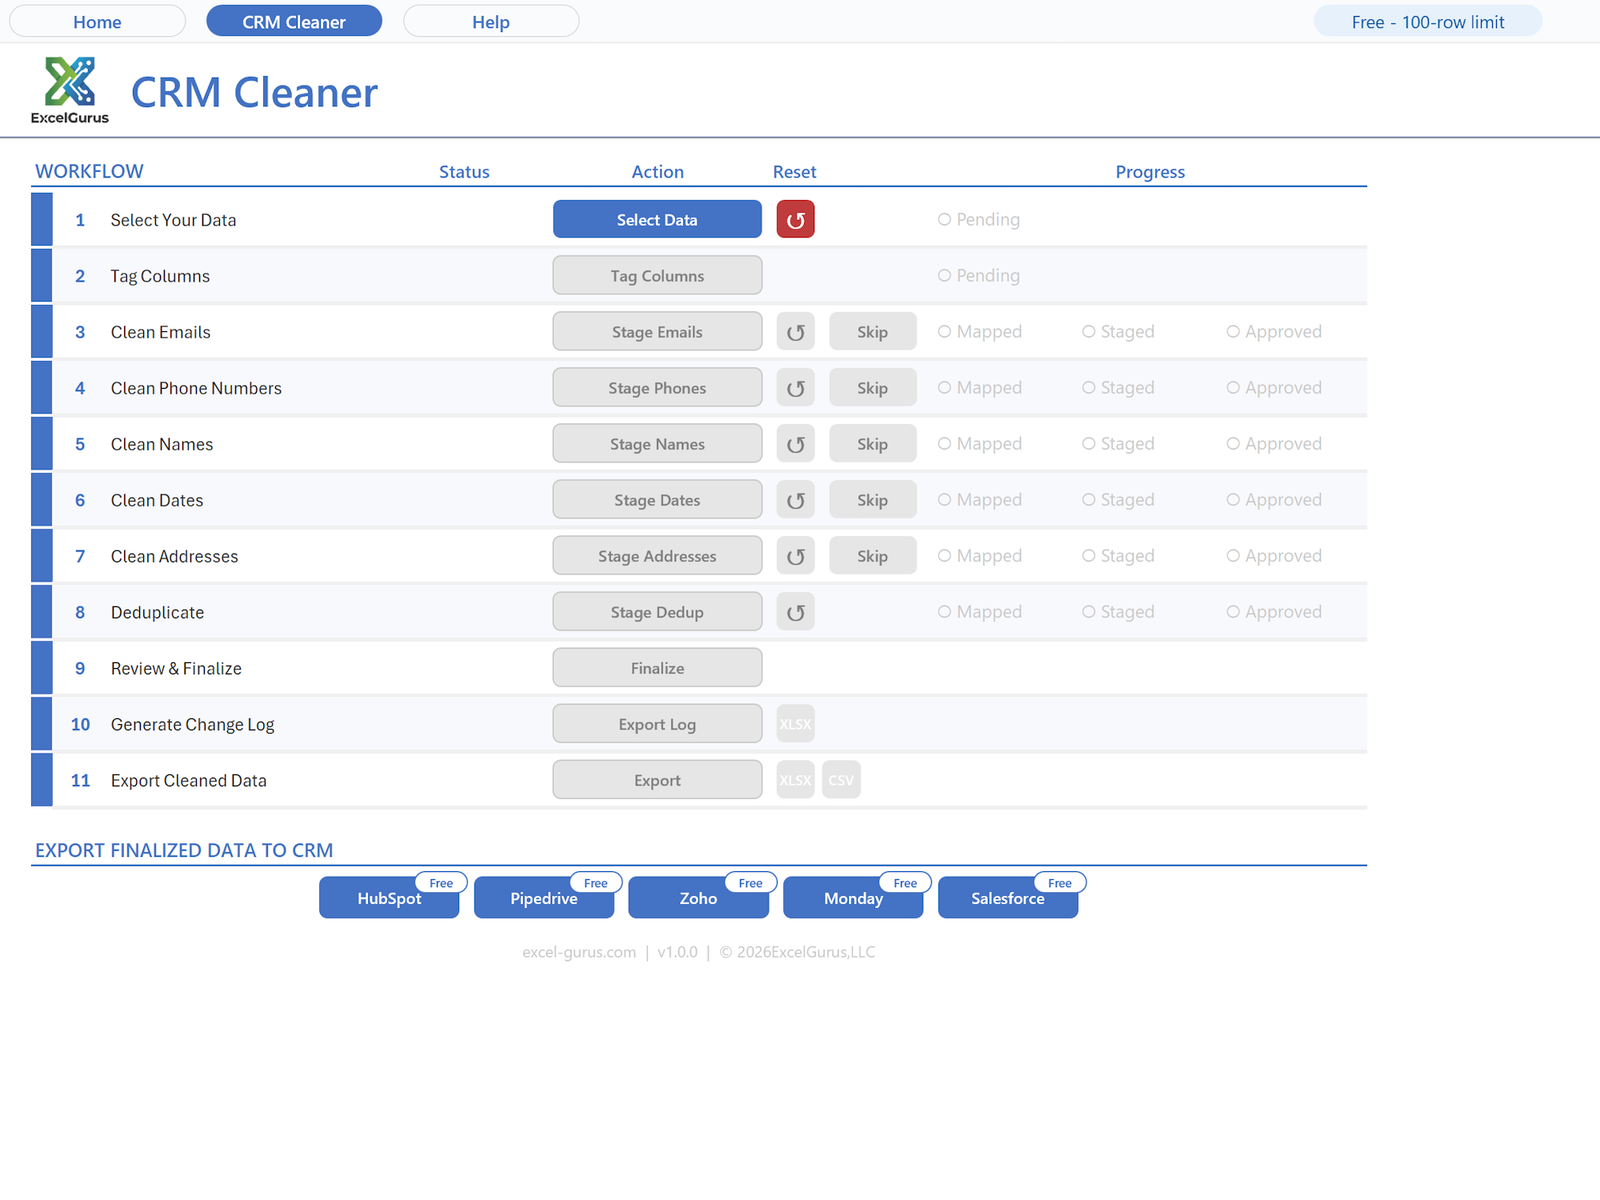
Click Open CRM Cleaner on the Home page to reach the dashboard. The dashboard lists every step in order, with a status on each so you can see your progress. You work top to bottom.
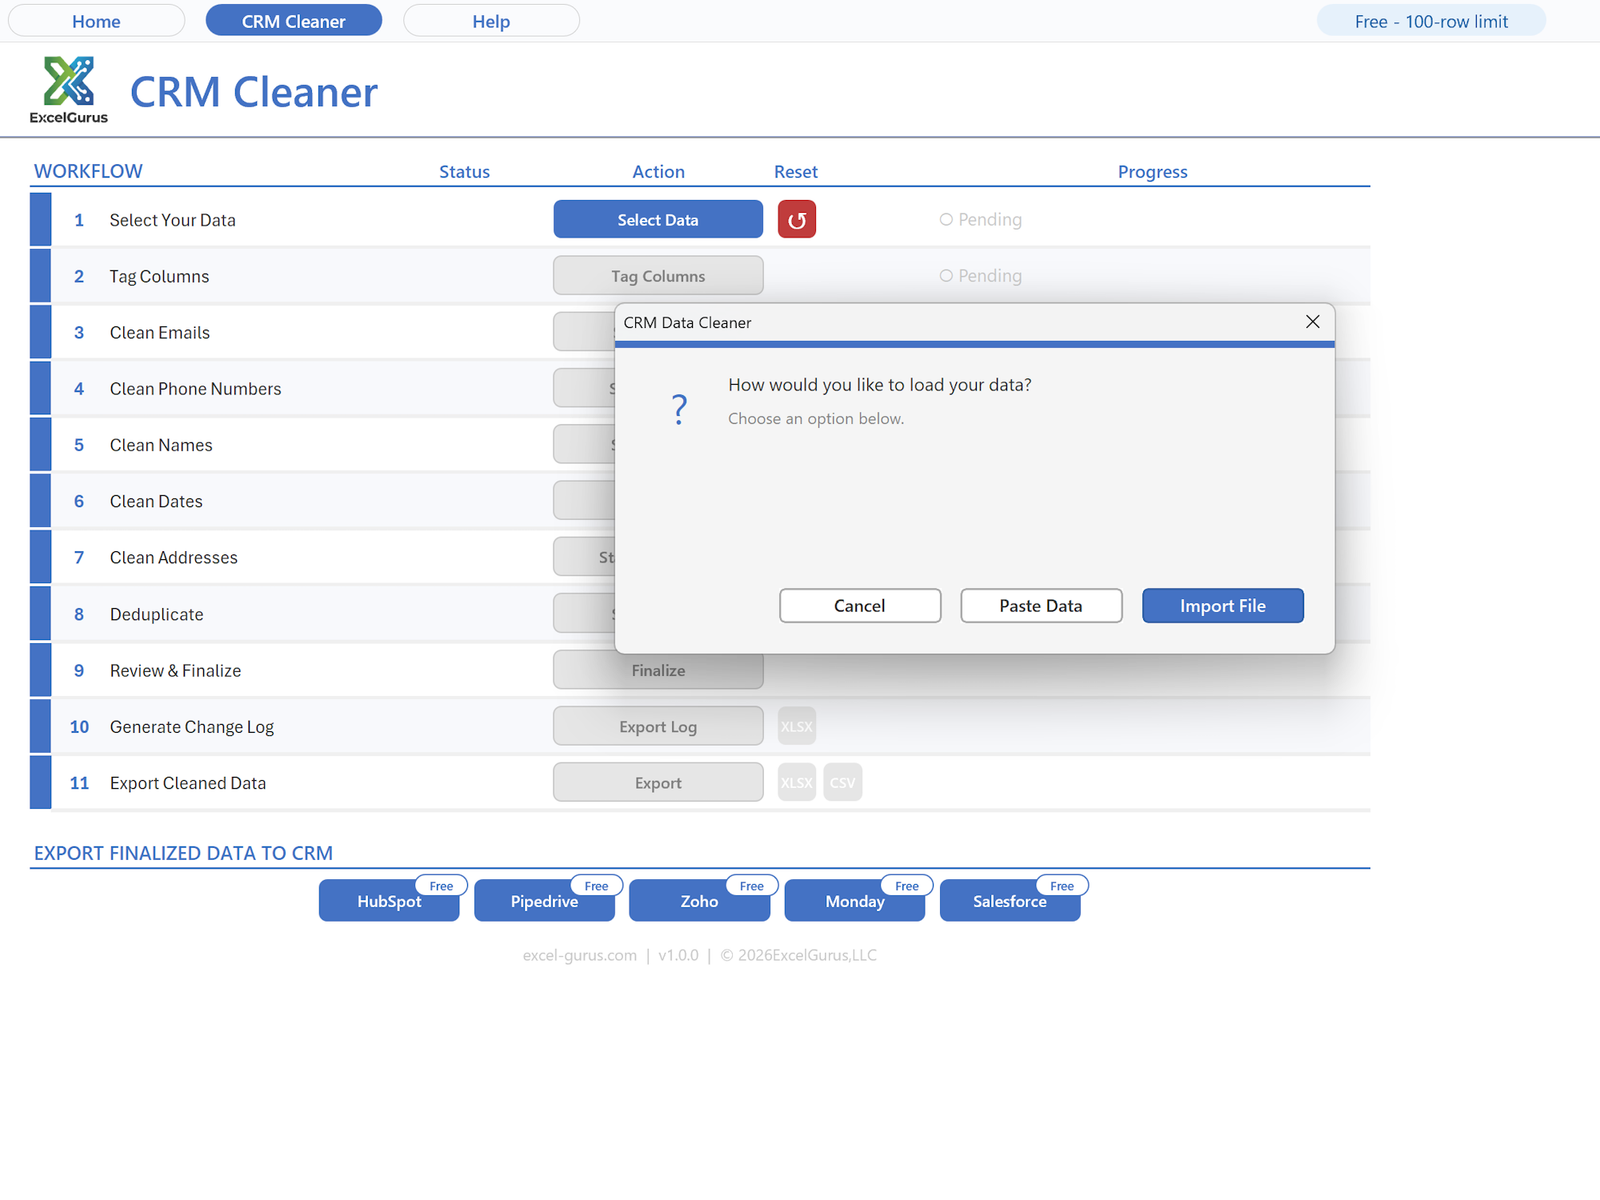
Bring in the contact data you want to clean. Click Select Data, then choose how to bring your data in: import a file (Excel or CSV) or paste your data directly. Either way, the tool loads your records so they’re ready to work with.
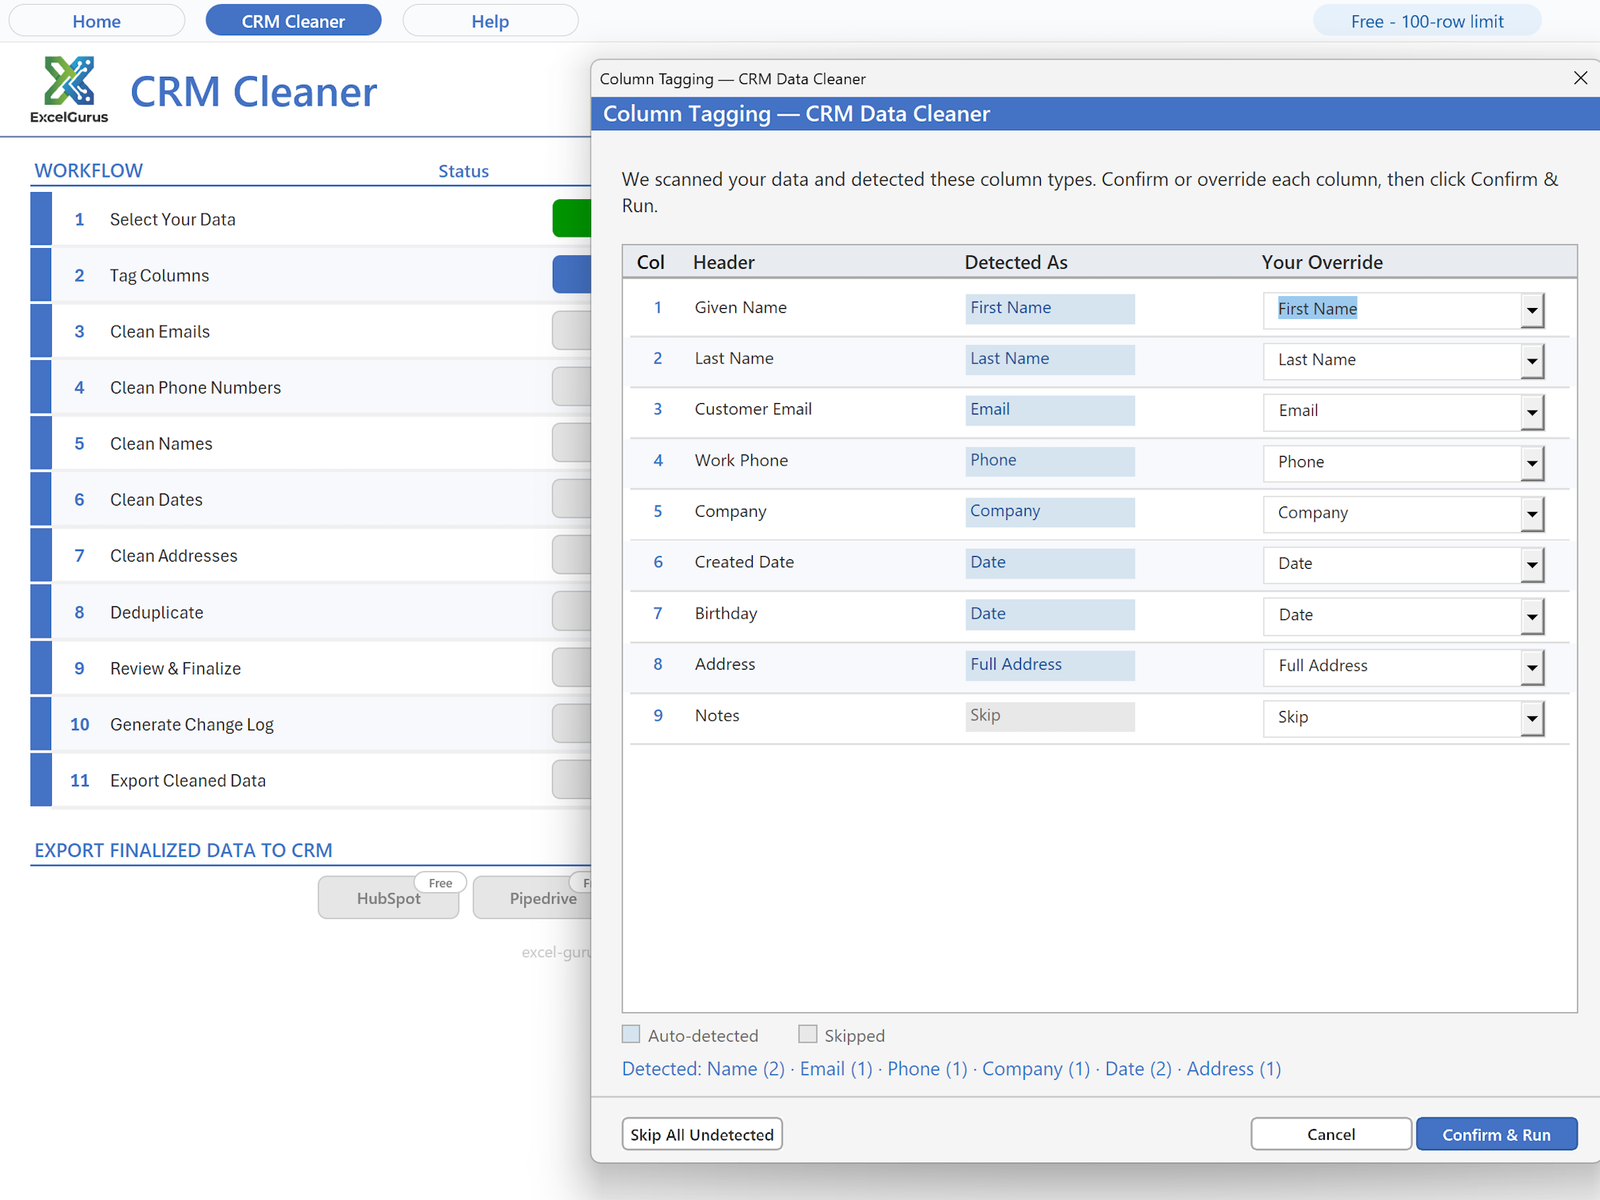
Tell the tool what each column contains — which one holds emails, which holds phone numbers, names, dates, and address parts. This mapping is what lets the cleaner know how to treat each column. You only do this once per file.
The tool cleans your data in five passes — Emails, Phones, Names, Dates, and Addresses. Each pass works the same way:
- Stage — the tool processes that data type and prepares the proposed changes.
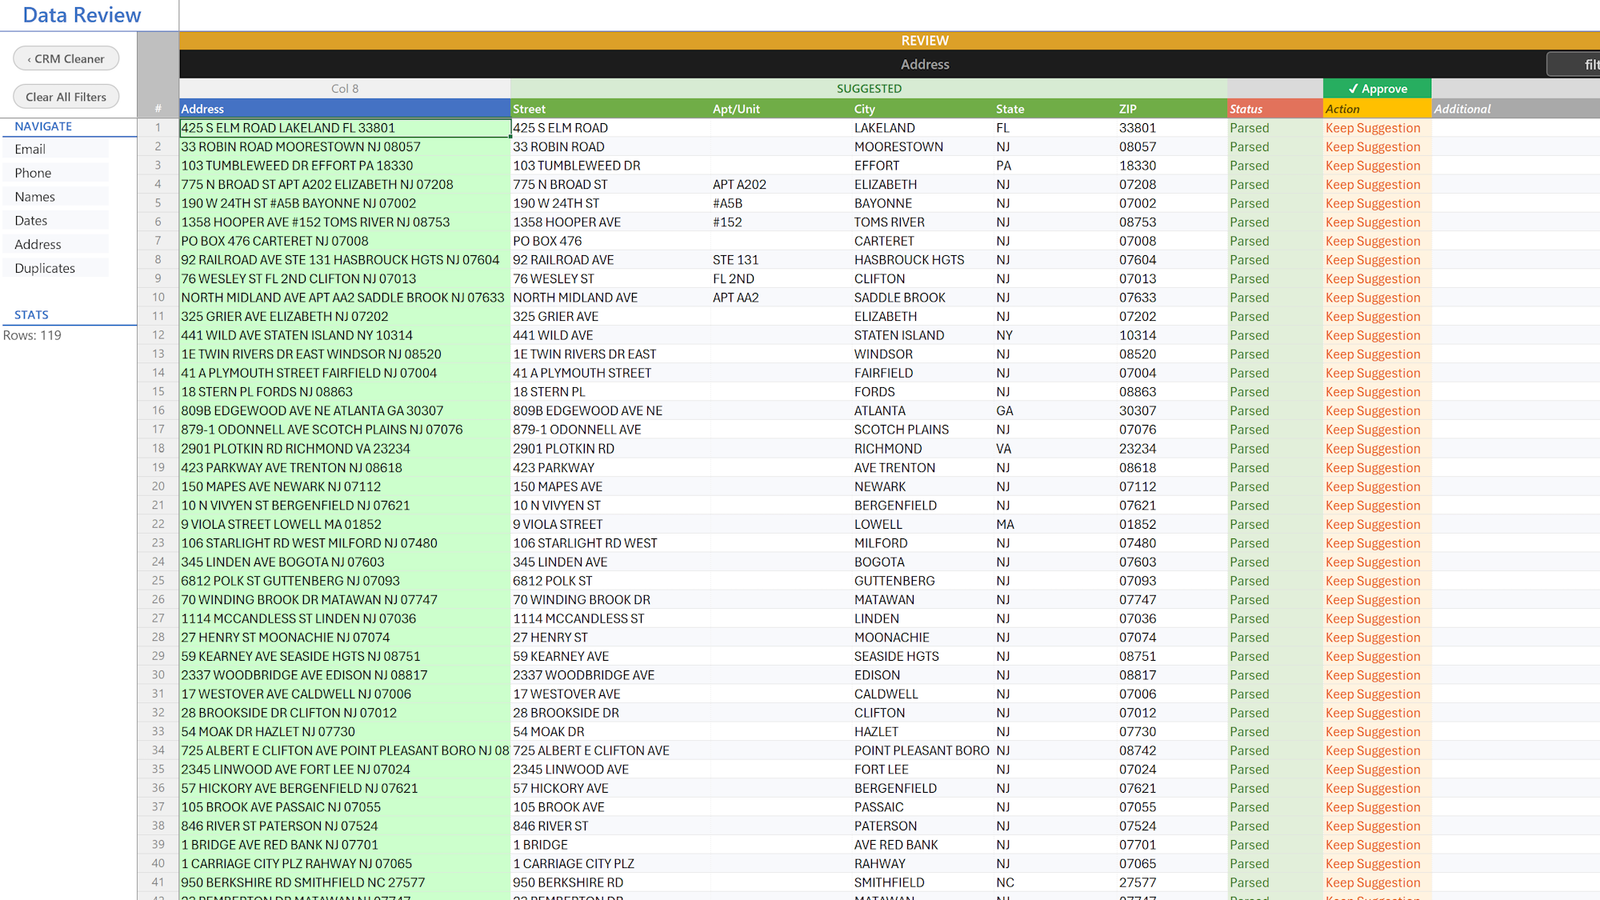
- Review & Approve — you see the original and cleaned values side by side and approve them. Nothing is changed permanently until you approve.
- View Results — once approved, you can revisit what was done at any time.
Don’t need to clean a particular data type? Click Skip on that step. Every step must be either approved or skipped before you can Finalize — so skipping is how you tell the tool to leave that data untouched and still move on.
Want to start a step over? Click the Reset button (the rounded arrow) on that step to clear it and run it again from scratch.
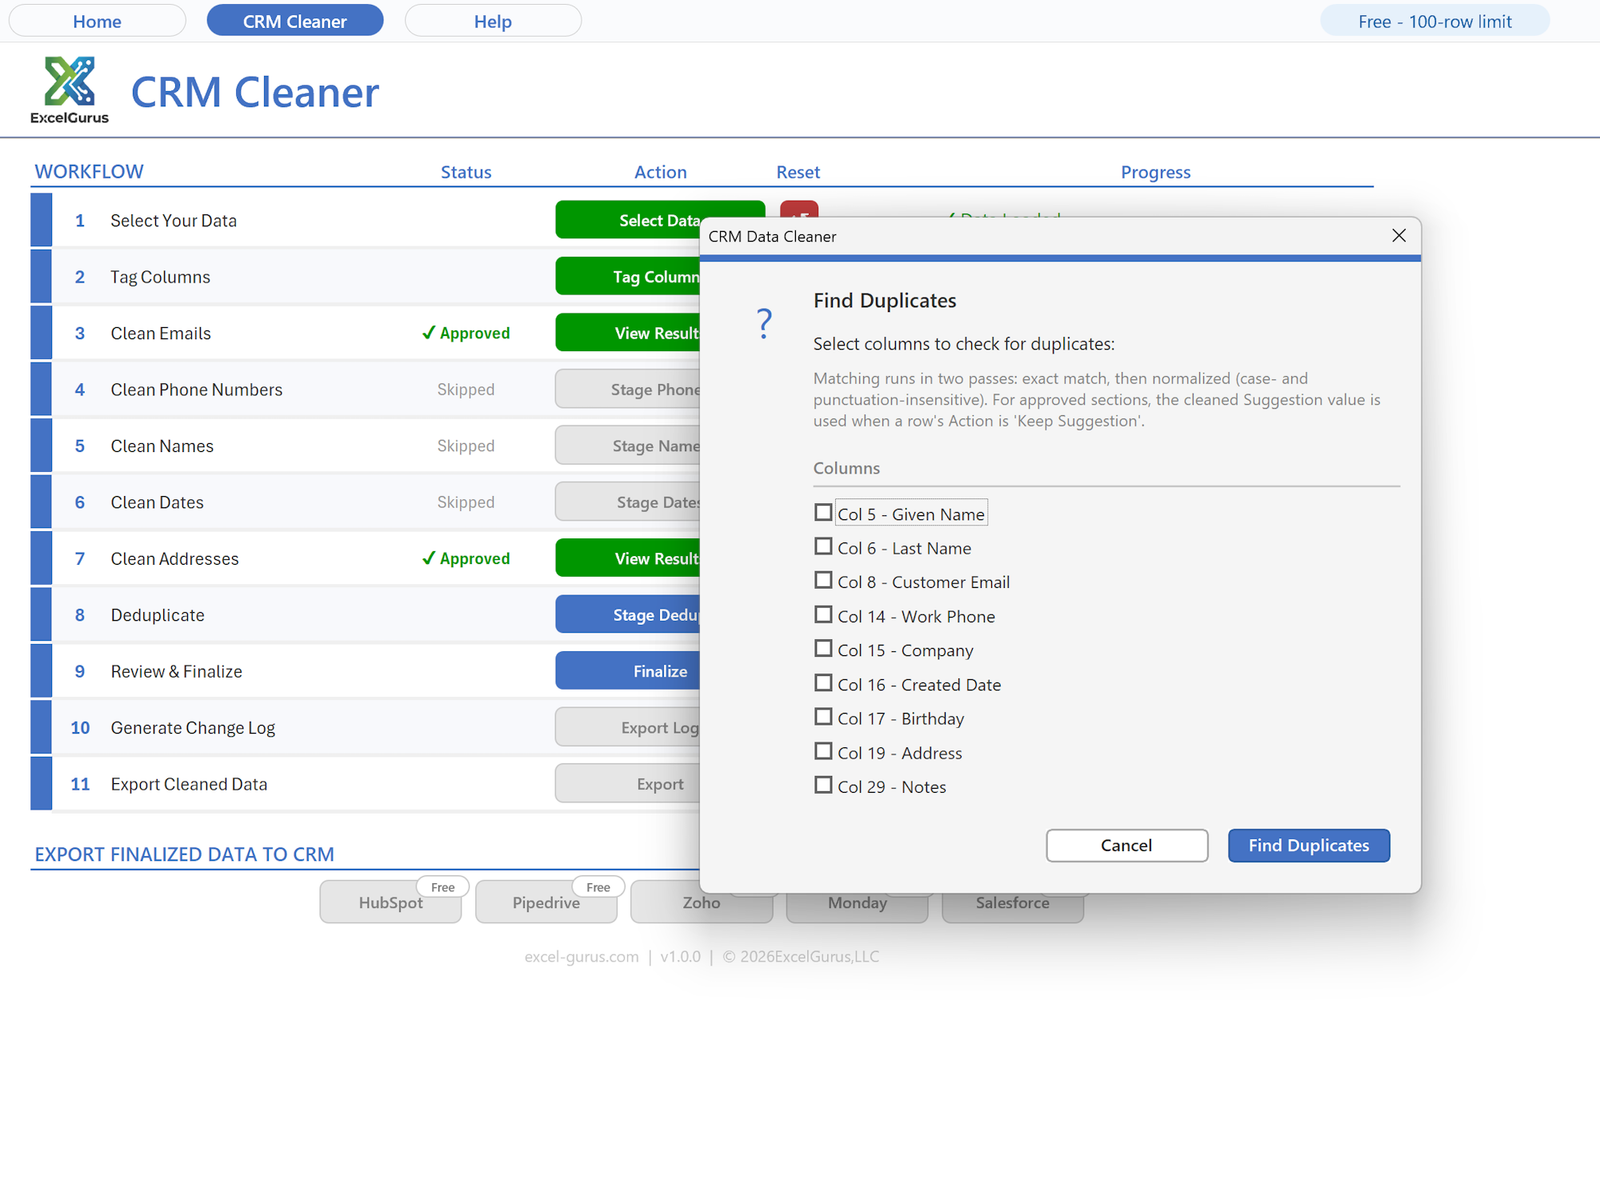
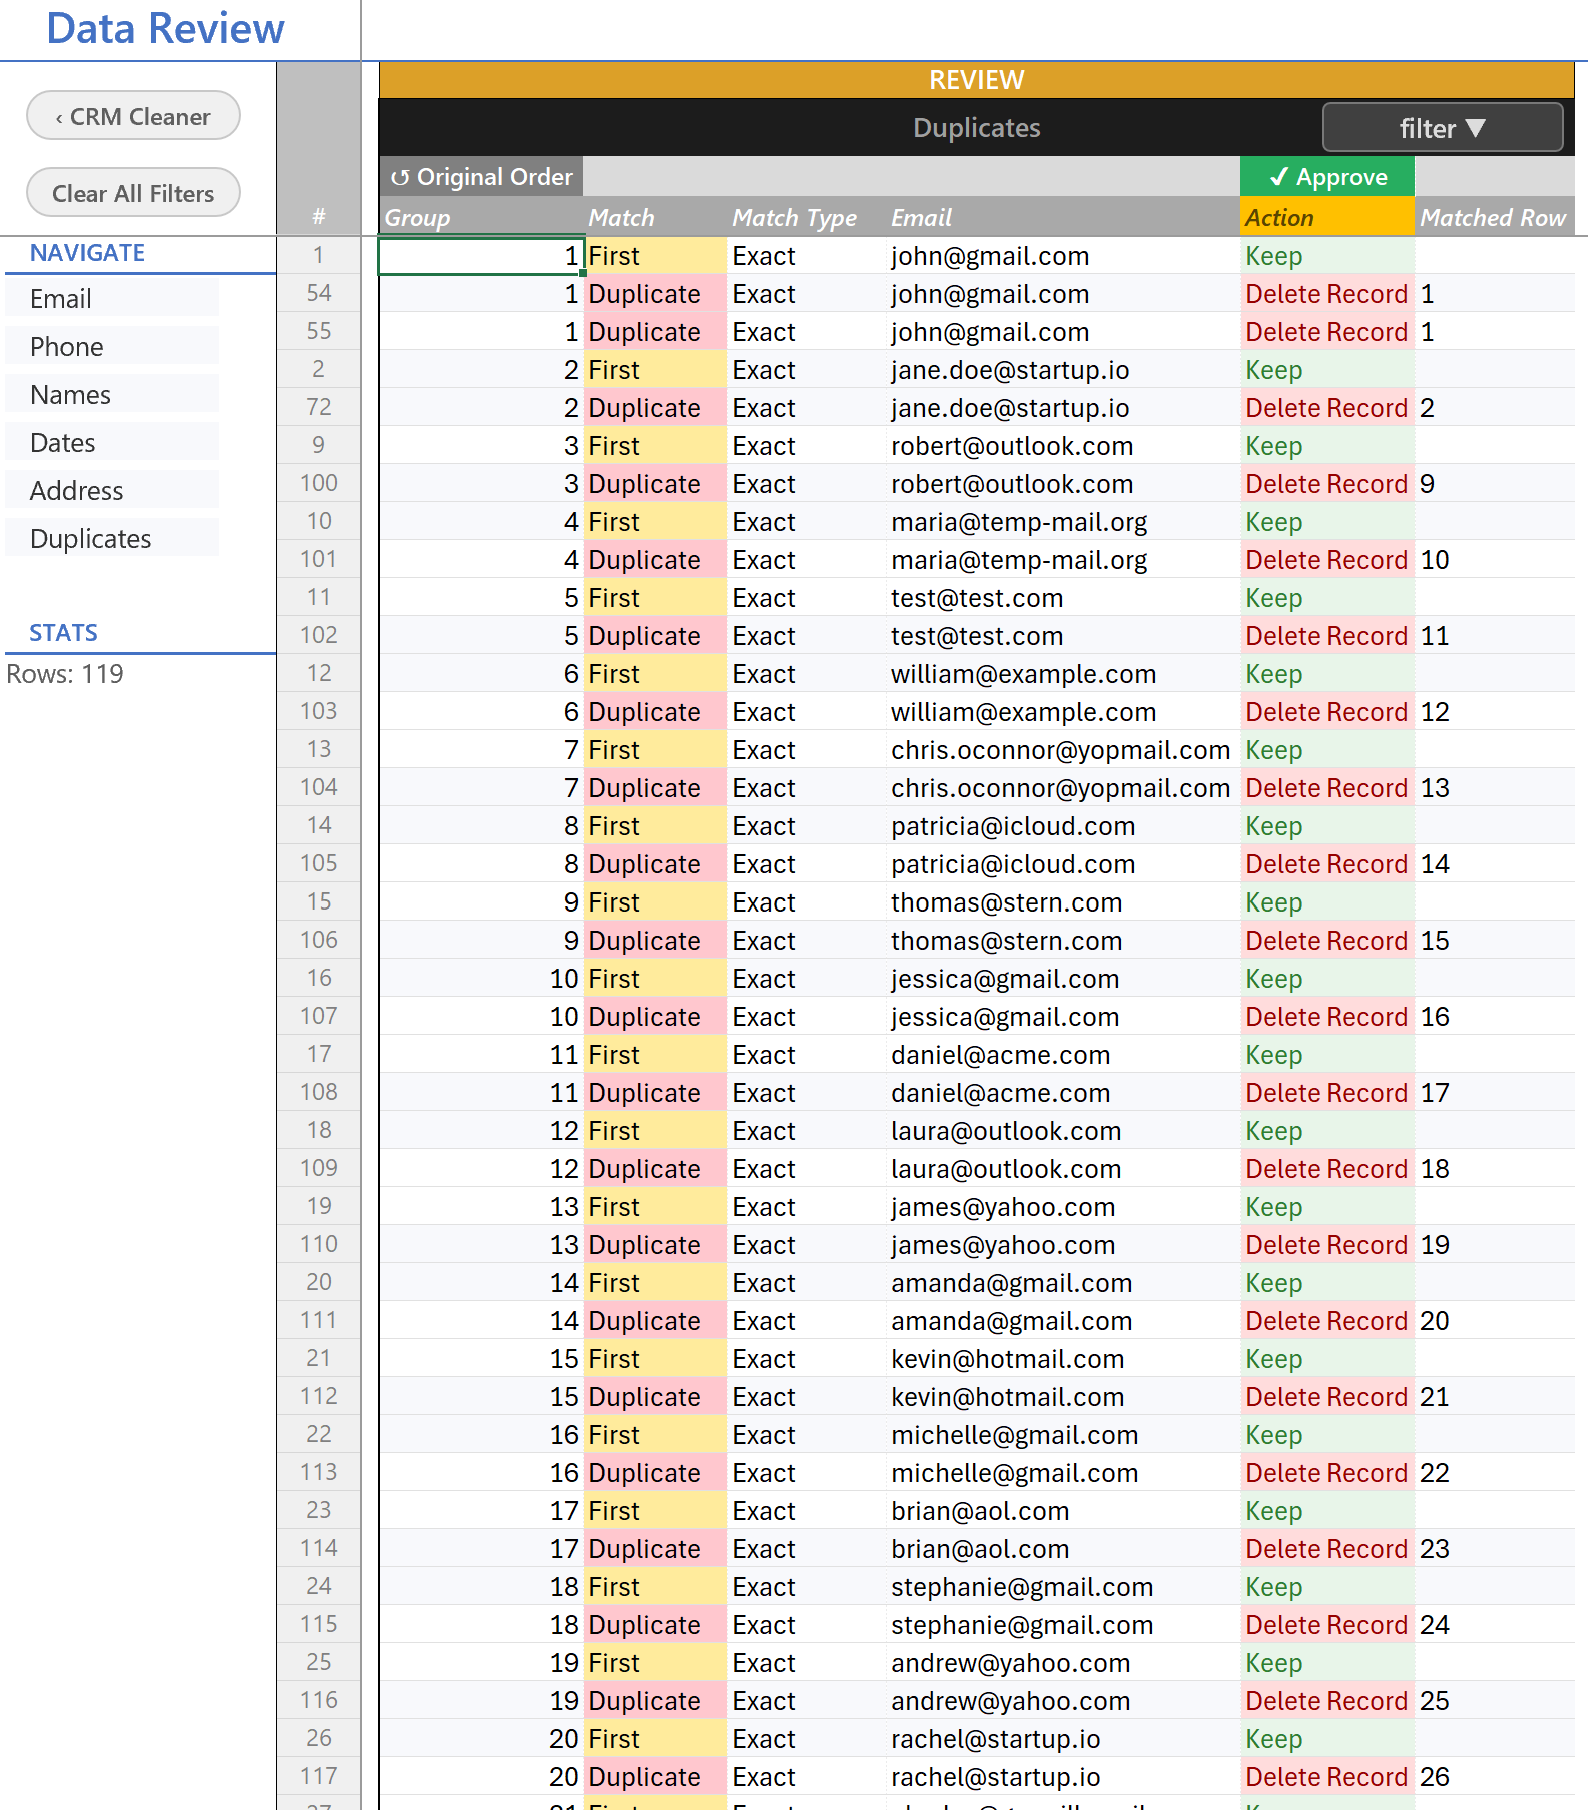
Removing duplicates works a little differently from the cleaning passes. The tool finds likely duplicate records using smart matching, then lets you decide what to do with each set — which record to keep and which to remove. Because this step affects whole records rather than individual values, it has its own dedicated screen for reviewing and confirming the duplicates before anything is removed.
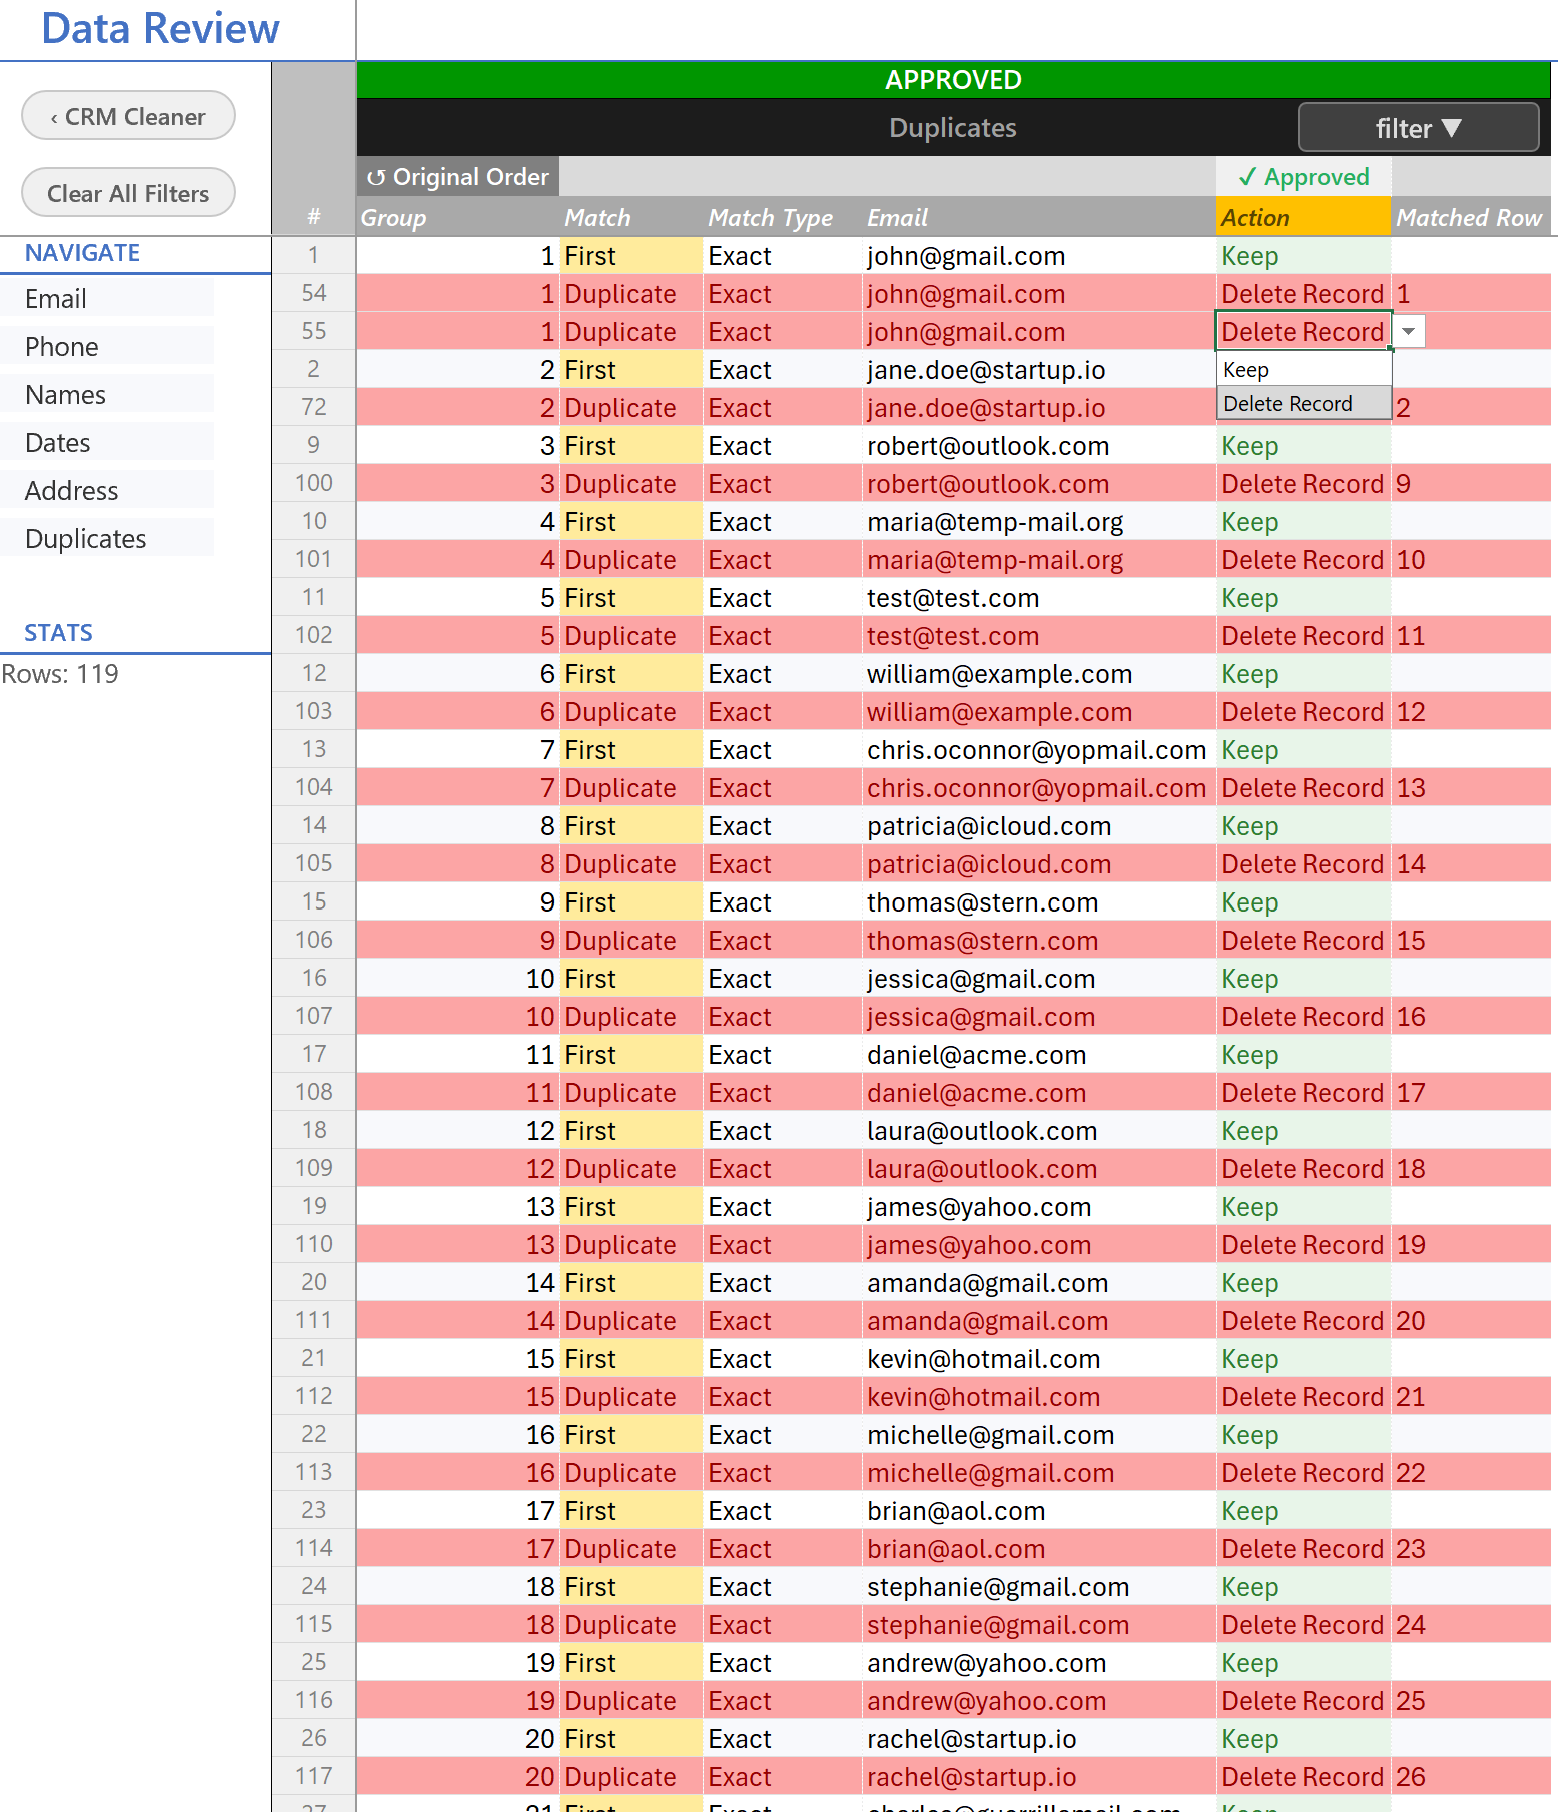
When all the cleaning passes are approved (or skipped) and duplicates are handled, Finalize assembles your approved changes into the final, cleaned dataset ready for export.
Optionally export an audit trail — a record of what was changed and which rows were removed as duplicates. Useful if you want to keep a paper trail of the cleanup.
Save your cleaned data as a finished file. You can choose the format and pick exactly which columns to keep — see Exporting below for the details. If you want a file formatted to re-import into a specific CRM, use the CRM export buttons — see CRM exporters.
What gets cleaned
Each cleaning pass targets a specific kind of data:
- Emails — validates format, separates multiple emails in one cell, and flags problems like typos in common domains, disposable addresses, and clearly fake entries.
- Phone numbers — strips formatting to a consistent form, separates extensions, resolves the country, and normalizes the national number.
- Names — standardizes capitalization and formatting across your name columns.
- Dates — converts mixed date formats to a consistent one, and keeps them stored as text so Excel can’t silently reinterpret them.
- Addresses — standardizes address fields (street, city, state, postal code, country).
- Duplicates — detects duplicate records using smart matching, then lets you choose which record to keep and which to remove.
Exporting your cleaned data
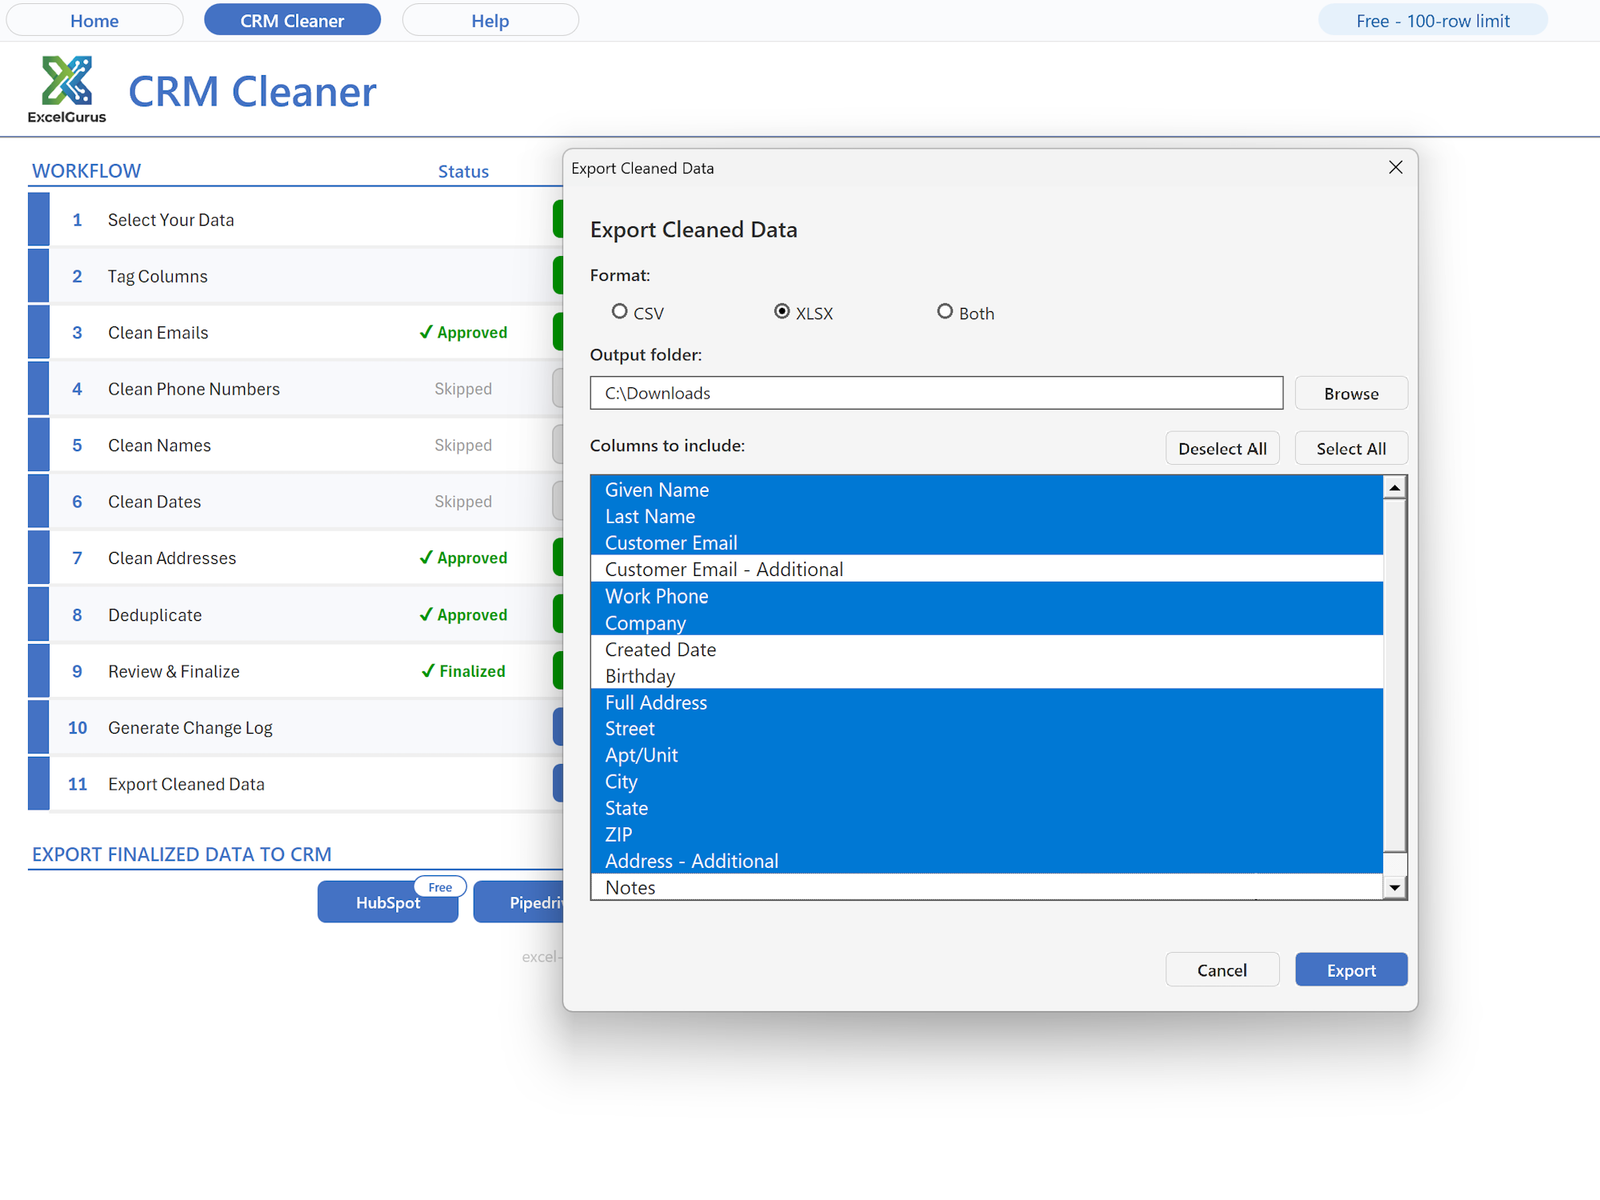
The Export step (step 11) saves your finished, cleaned data as a file. You get a few choices:
- Format — export as CSV, Excel, or both.
- Columns — pick from a list exactly which columns to include. If your original data carried columns you no longer need, you can leave them out and keep only what matters.
This cleaned-data export is available on every license, including the free tier (within the record limit).
CRM import-ready files (exporters)
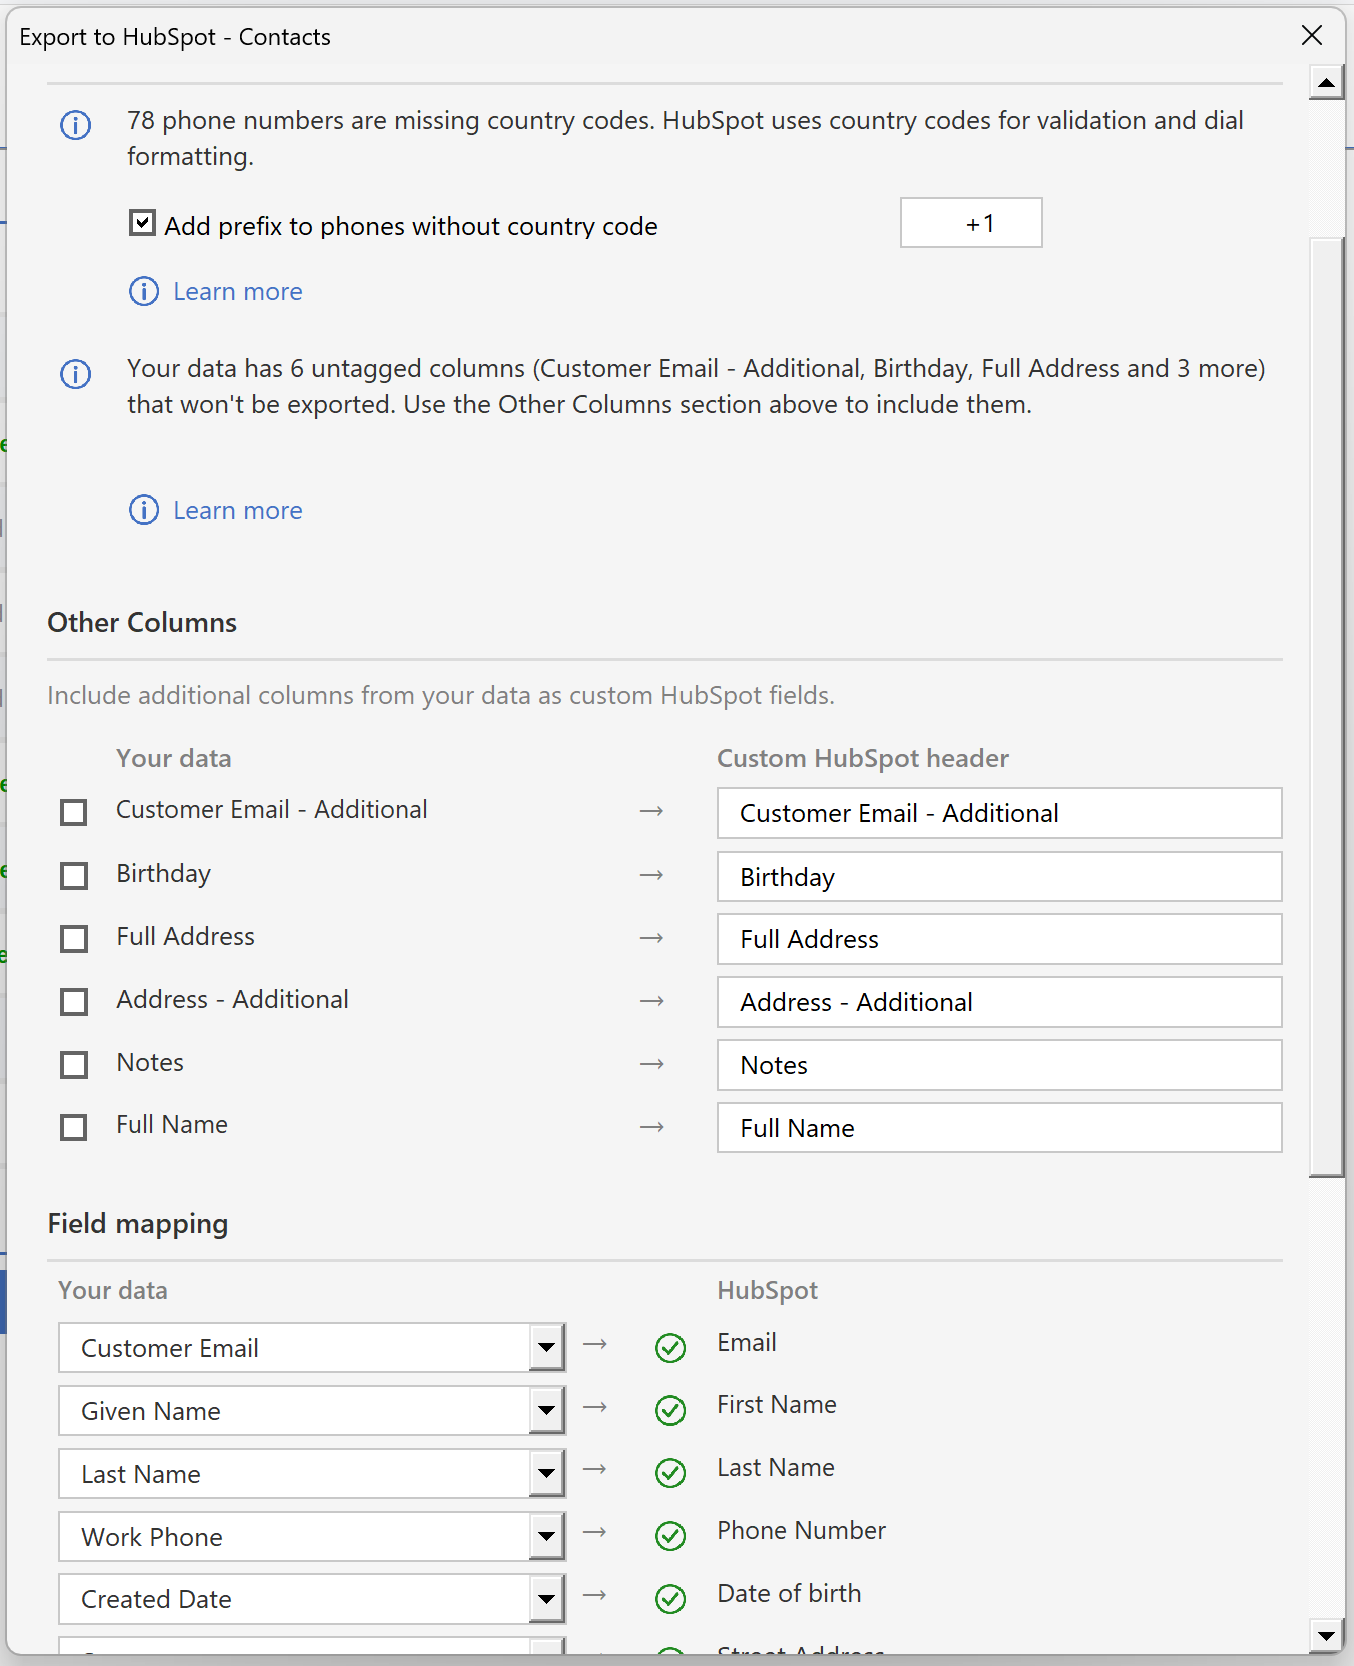
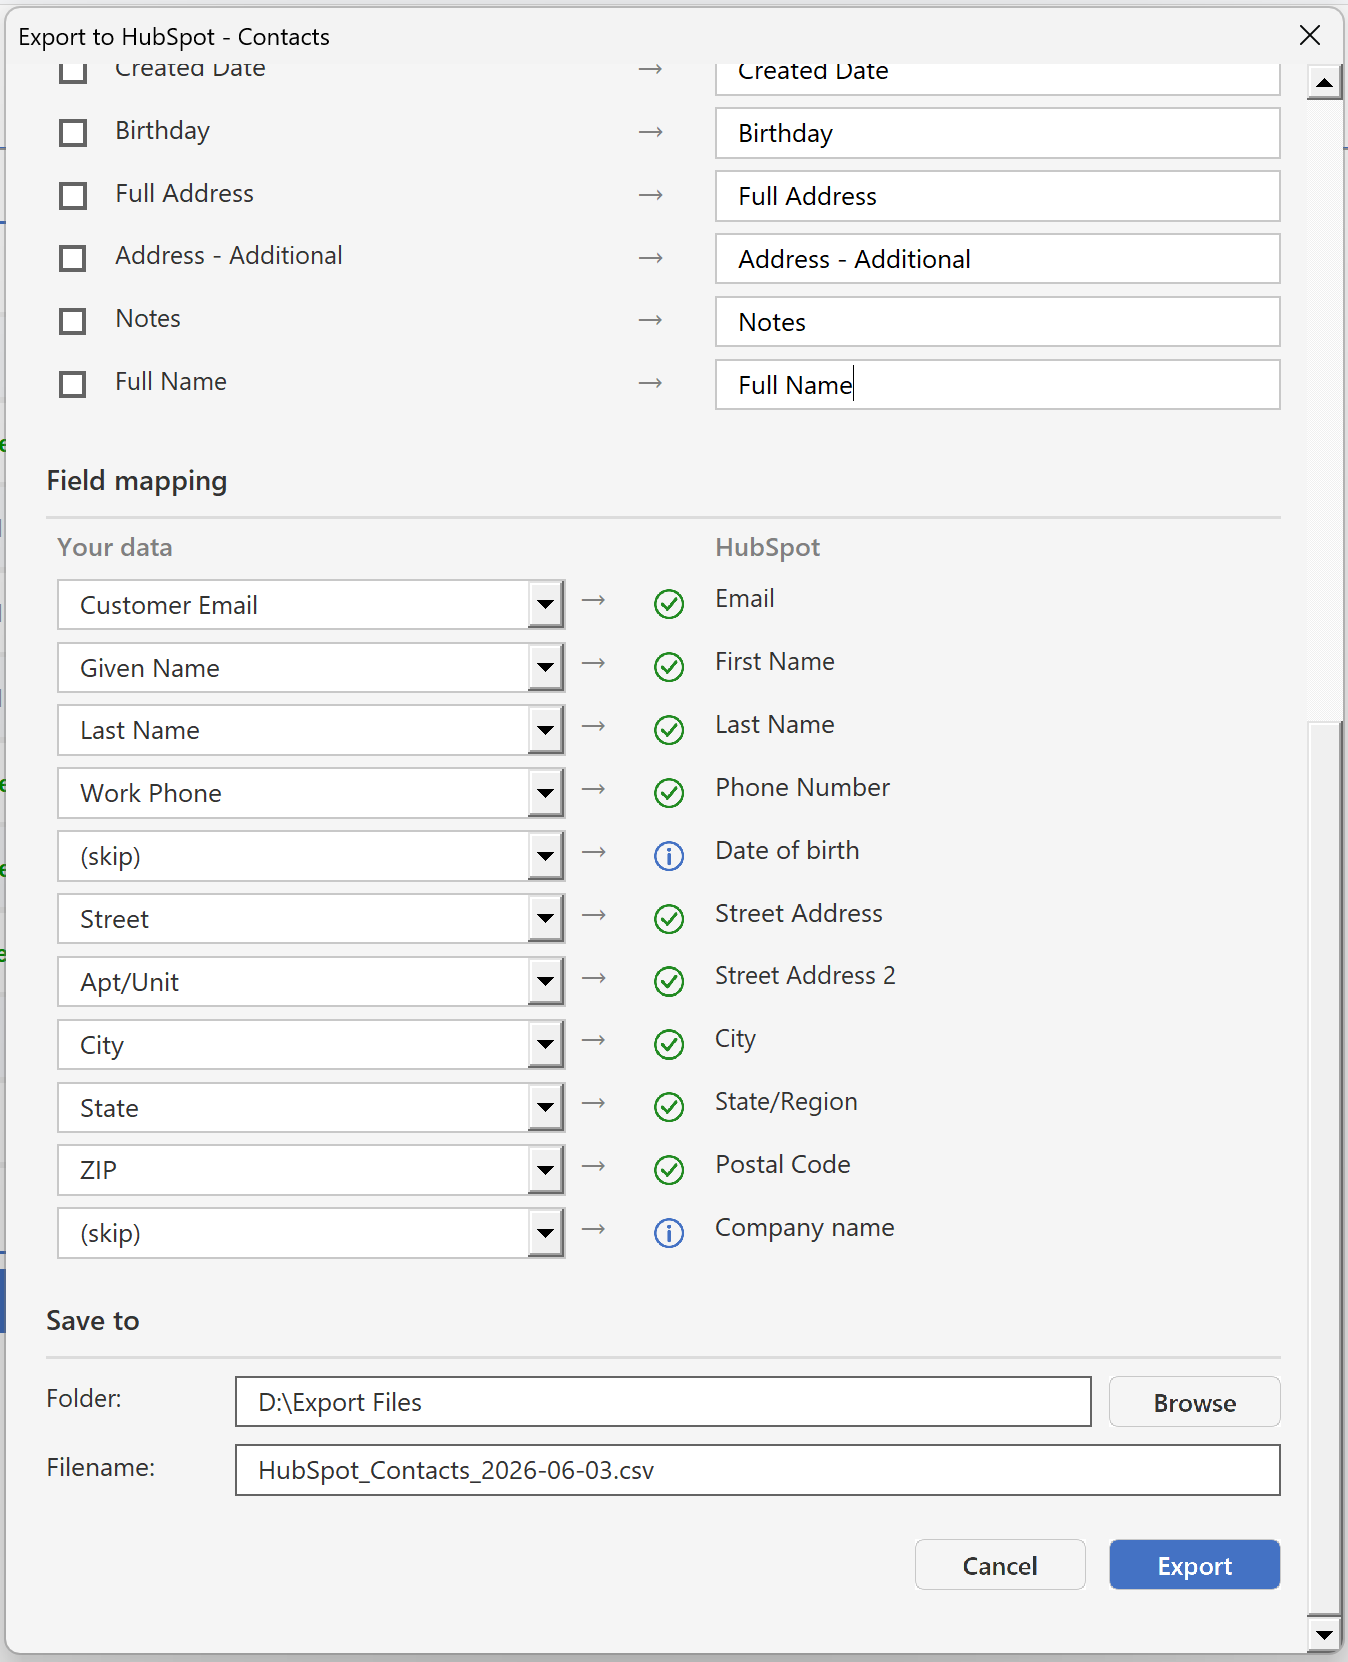
Beyond a plain cleaned spreadsheet, Excel Data Cleaner can produce a file formatted to import directly back into a specific CRM — with the exact columns and headers that system expects, so you skip the manual re-mapping that usually makes re-importing painful.
The CRM exporters are optional paid add-ons — one per CRM, or available as a bundle. The five supported CRMs are HubSpot, Salesforce, Zoho, Pipedrive, and Monday. You can try any exporter within the free 100-record limit before purchasing; activating the add-on removes that limit for that CRM.
View exporters & pricingWhen you run a CRM exporter, you choose:
- Record type — depending on the CRM, you can export your data as Leads, Contacts, or Accounts (the available types vary by CRM, matching how that system organizes records).
- Columns — the exporter always includes the columns that CRM requires for a clean import, and you can add any additional columns you want to bring along.
Licensing & activation
- Free tier — clean and export up to 100 records per import, no purchase required. Good for trying the tool or small jobs.
- Cleaner license — removes the record limit so you can clean files of any size.
- CRM exporters — unlock the import-ready file export for each CRM you need, individually or as a bundle.
Don’t have a license yet? You can view pricing and purchase here.
Activating your license
Enter your license key to activate. Activation happens online and ties your license to your computer. A single license can run on up to two computers.
Moving to another computer
To move your license, deactivate it on the current computer first, then activate on the new one using the same key.
Troubleshooting common problems
- Buttons don’t respond — macros are probably disabled. See how to enable macros.
- Can’t click Finalize — every cleaning step must be either approved or skipped first. Check for any step that’s still pending and either Review & Approve it or click Skip.
- “License not verified” message — reconnect to the internet and click Refresh to re-check your license.
- Hit the record limit — the free tier cleans up to 100 records per import. Activate a Cleaner license to remove the limit.
- Activation won’t go through — make sure you’re online and your key is entered exactly. If it still fails, contact support with your license key.